Spectrometer Client Installation
For installation on Windows machines, install Cmder Linux console simulator. The full version comes with Git for Windows. Using Cmder will make installation procedure on Windows and Linux machines nearly the same.
The only dependency that you will need to install is node.js. Installers are available for Windows 10 as well as wide variety of Linux platforms including CentOS used by Bruker on their Linux workstations. Any feedback from attempts to install NOMAD client on an older machines are welcome.
After you have installed node.js, navigate to the folder where you want to install the client. For example:
## Windows
cd C:\Bruker
## Linux
cd  /opt
Download the latest release of the source code from Github and uncompress .zip or .tar archive
You can also use git command to clone the repository.
git clone https://github.com/nomad-nmr/nomad-spect-client.git
Navigate to the folder with the source code and install JS dependencies
cd nomad-spect-client
npm install
Create folders for status and submit files
mkdir status_files
mkdir submit_files
Client Configuration
Before you start with client configuration, you need to create at least one instrument in NOMAD database to get instrument ID. Then execute configuration script
npm run config
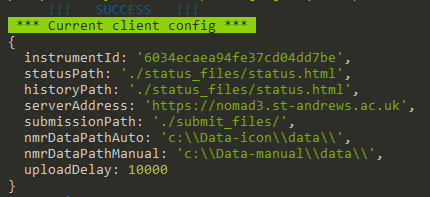
You will need to fill in following entries
- instrumentId: Unique ID of the NMR instrument that is generated when entry for the instrument is created in NOMAD configuration.
- statusPath: Relative path to IconNMR status.html file. (./status_files/status.html)
- historyPath: Relative path to IconNMR history.html file. Keep it same as statusPath if both IconNMR status and history are written in the same file. Recommended. (./status_files/status.html)
- serverAddress: URL of your NOMAD server (https://nomad.my-uni.ac.uk)
- submissionPath: Relative path to IconNMR external set up folder. (./submit_files/)
- nmrDataPathAuto: Absolute path to IconNMR data folder. (c:\Data-icon\data\)
- nmrDataPathManual: Absolute path to manual data folder. (c:\Data-manual\data\)
- uploadDelay: Delay for data upload [ms]. (10000) If set to short data upload can be triggered before Topspin is finished with processing.
At the end you should see something like this.
Ctrl + C to exit client configuration.
The relative paths defined here need to match those set in IconNMR configuration.
NOMAD client archives copies of datasets stored in folder defined by nmrDataPath variable in the client configuration. Therefore, NOMAD client won't interfere with your existing set up for NMR data archiving and you can run both systems in parallel.
Start client
Start the client in verbose mode to see if it runs correctly
npm run verbose

Star client on Windows startup
Create a .bat file
cd C:\Bruker\nomad-spect-client\src
npm start
Then use Windows Task Scheduler as Administrator to execute the .bat file on Windows startup.
Update client
Stop the client by Ctrl + C or use Windows Task Scheduler
If you installed the client using git clone command then
git pull
npm install
Otherwise download the newer release from Github, uncompress .zip or .tar archive to replace the folder with existing source code and install JS dependencies.
npm install
If git pull command fails very likely some changes were done in the working directory by npm install command. In that case, stash the changes and repeat pull.
git stash
git pull